 |
HerkuleXLib
1.1
Arduino library to drive HerkuleX DRS-0101 and DRS-0201
|
Please consider the following comments to use the library:
*The printout mode displays send/receive data and errors through the Serial Monitor on the computer
This work was inspired by the code from Alessandro Giacomel proposed here: http://robottini.altervista.org/dongbu-herkulex-arduino-library-2. The software serial option was not considered because it is limited to a baud rate of 57600 bps that generates some communication problems to feedback informations from the servos to the Arduino card.
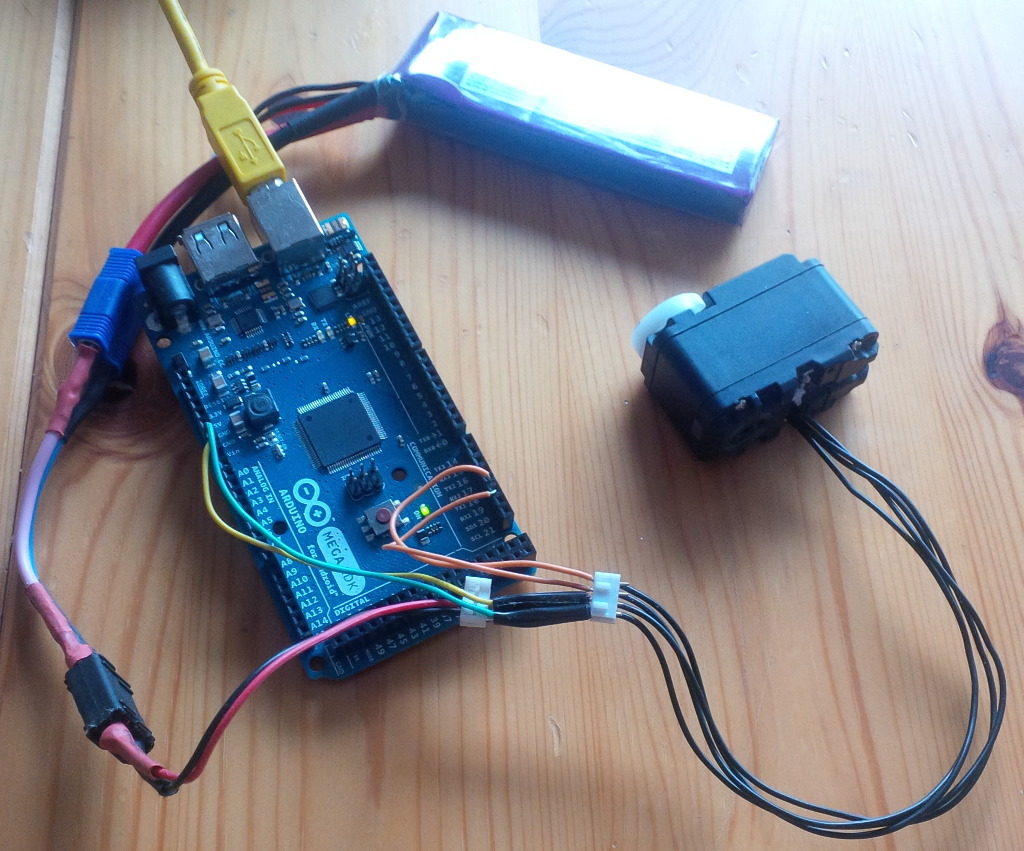
The wiring of the servo with an Arduino MEGA (on Serial1 port) is sketched and photographed below.

Download the last version of the library from: http://www.benoitpuel.com/blog/...zip
For the first install, open Arduino software and add the library as described here: https://www.arduino.cc/en/Guide/Libraries#toc4. In a nutshell, go to menu Sketch > Include Library > Add .ZIP library, then select the library from your download folder.
To update the library, you need first to remove the previous version. For that, open Arduino software and an example from this library (menu File > Examples > HerkuleXLib > MyFirstHerkuleXLib_MEGA). Then open the directory in the file manager (menu Sketch > Show sketch folder). Go up 3 level in the file tree in the folder called "libraries" and delete the folder called "HerkuleXLib". Then close Arduino software, reopen it (to refresh its alvailable libraries) and install the last version of the library as for a first installation.
The following example is proposed for the case of Arduino MEGA (see Wiring).
For writing your first Arduino program using the HerkuleXLib library, first open Arduino software and create a new file (menu File > New). Save it (menu File > Save) as "MyFirstHerkuleXLib_MEGA". Include the library to the project (menu Sketch > Include library > HerkuleX). You should get the following code:
Even if all the headers are not necessary, lets keep them all to avoid errors. Let's now create the instances for the printout, the communication and the control position for one servo.
The servo has its LED and torque off (torque off means that you can turn the servo manually).
To turn the LED to red colour, add the following lines (more details here: HkxPosControl.setTorqueLEDControl()).
And I guess you bought this servo and install this library for one main purpose: moving the servo! The code below will execute the move and change the color of the LED to blue for the servo moving period only (more details here: HkxPosControl.movePosition()).
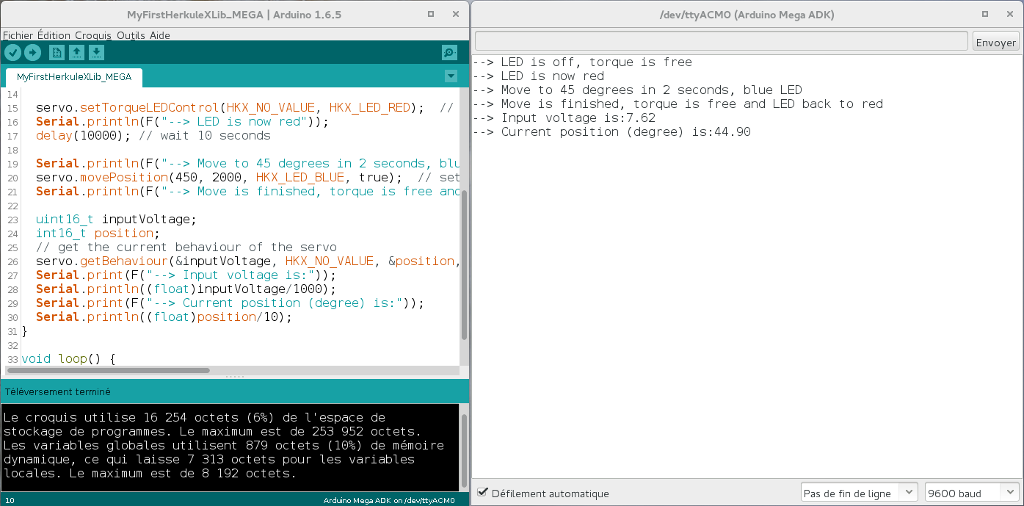
One nice feature of this servo is that you can get some feedback measures. For instance, you can read the input voltage (voltage of the battery if powered with a battery) and the current position (more details here: HkxPosControl.getBehaviour()).
You can now compile and transfer the program, open the serial monitor and you should see the following display.
You can find this code from the menu File > Examples > HerkuleXLib > MyFirstHerkuleXLib_MEGA
The same example is available for Arduino UNO in the menu File > Examples > HerkuleXLib > MyFirstHerkuleXLib_UNO. As said in Limitations, there no possible printout to serial monitor with the Arduino UNO.
First realise
Serial with Arduino Micro (Serial being Serial_ and NOT HardwareSerial type for this board).This project is released under the GNU GPL V3 (see http://www.gnu.org/licenses/gpl-3.0.en.html).
Email: contact@benoitpuel.com
Web: http://www.benoitpuel.com
Author: Benoit Puel
 1.8.10

